Network Modification Brief (Coursework)
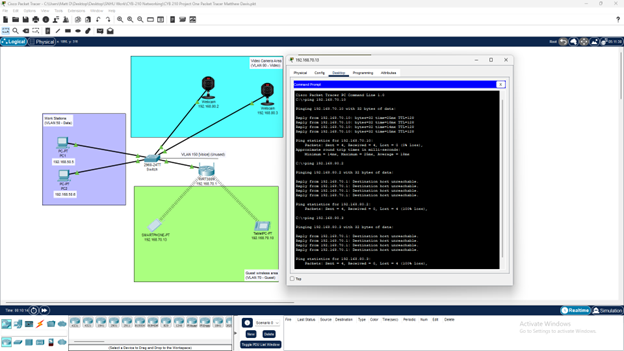
The goal here was to keep the data, video, and guest wireless networks segmented to increase security and improve traffic flow. To achieve this, I configured separate VLANS for each network, and connected them to a single switch. The data network is on VLAN 50, the video network is on VLAN 80, and the guest wireless network is on VLAN 70. It is worth noting that VLAN 150 was previously created for a voice network but is currently unused. After adding names and a number to create the VLANS, I then configured the interface of the fast ethernet ports on the switch connected to each device to function on the corresponding VLAN. I also double checked and made sure that the port status for each interface had “on” selected. For best practice purposes, I did disable all unused ports, including the port associated with VLAN 150, to increase security and prevent unwanted access to the network. Next, I added the wireless router to the network that the guests will use to access the internet. After setting up the DHCP server, which we will go into with more detail below, I then proceeded to assign the static IP addresses, subnet mask, and default gateway to the webcams on the video network. This step is required to access the cameras remotely over the network, but I believe an additional IoT server would also need to be set up to accomplish this. Although the cameras are hardwired to the switch, they are still able to connect to the same gateway as the guest wireless network, and because the video network is on a separate VLAN, the webcams are secure and inaccessible to anyone using the guest network. The guest wireless network as it is currently configured can accommodate up to 70 users. The IP addresses will be given out dynamically via the DHCP server. I was unable to change the lease renewal time to the recommended 4 hours as I was unable to access the option to do so on the router’s GUI, therefore the default lease time of 24 hours will unfortunately be applied. If this proves to be an issue moving forward, I recommend increasing the maximum number of users for the guest network. The network address of 192.168.70.0/24 has a range of 256 addresses in total and should provide adequate scalability for future growth. However, the network setup may have to be changed according to how these addresses will be distributed depending on the needs of the organization. For example, you may want to increase the maximum number of guests users on the 192.168.70.0 network, add more webcams on the 192.168.80.0 network, or place additional workstations on the 192.168.50.0 network. These are all possibilities with the host range that the /24 CIDR provides. Furthermore, there will be plenty of potential subnets available using the 255.255.255.0 subnet mask to create a new one for the voice VLAN when we are ready to implement VoIP. Right now, 256 potential hosts may seem like overkill, but it may prove to make expansion much easier. By keeping security, scalability, and availability at the forefront of importance when it comes to the design of the network, I believe this network will provide sufficient service for the foreseeable future.
 This was a coursework project
